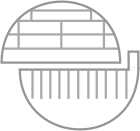
Flat sawn boards are cut from the log where the growth rings run parallel to the wide faces of the board. Flat sawn lumber is the most commonly produced as it is very quick to cut and creates less waste.
The flat sawing method of cutting boards is great when dealing with high-tensioned logs. With the grain running parallel with the wide faces of the board, the boards will tend to bow upwards. Flat sawn boards have a lot of flex, therefore bowed boards can be straightened through correct fillet stacking and being weighted down during the drying process.
Flat sawn boards can be a disadvantage when used for applications such as treads on a staircase, as they can flex or bend when under pressure. They are great for applications where you will be nailing through the board, as they are less prone to splitting. It is also harder to match the grain when laminating boards together.

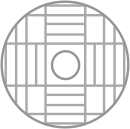
Quarter sawn boards are cut from the log where the growth rings run parallel to the narrow sides of the board. This style of cutting is considered to be the most ideal cut, and is more attractive than flat sawn lumber. Some species of trees such as oak reveal beautiful ray flecks when quarter sawn, and these boards are prized among furniture craftsman. Quarter sawn boards are much easier to match the grain when boards are laminated together.
For many sawmills, producing quarter sawn boards takes longer to cut, produces less board footage (cubage) and creates more waste. The flexibility of a Peterson Portable Sawmill makes cutting quarter sawn lumber an easy task with minimal effect to production figures, speed of cut and waste. The unique design of the Peterson Portable Sawmill allows you to cut quarter sawn boards directly from the log with no additional log or board handling.
Quarter sawn lumber produces a beautiful grain, which is ideal for use in areas on display such as cabinets and doors etc. Quarter sawn boards behave in the opposite manner to flat sawn lumber. They have a lot less flex because the grain runs perpendicular to the face of the board. Quarter sawn boards are quite stable and very strong, and are therefore ideal for use in weight-bearing applications.
When cutting quarter sawn lumber from high tensioned logs the grain will cause the board to bow like a banana. As quarter sawn boards are very strong, bending these boards straight is almost impossible, and for this reason we recommend flat sawing high tension logs.

Tapers are done with an attachment to obtain weatherboards/beveled siding straight off the log.
Beams and Double cuts are easily obtained with the Peterson without the need for turning the power head around, and by utilizing both sides of the blade. L-shapes are also obtainable, ideal for corners of houses, bench seats, etc.
One wide slab is attainable from every log without purchasing a slabber. After milling half way through the log, flip it onto the top of a half sawn log, and continue milling as per normal. If you don’t require a multiple of slabs this is an accurate, economical method of producing them. You then have the option of leaving a live edge for a rustic look, or flipping the blade to the vertical position and cutting the edge to leave a perfectly square slab.
Re-sawing is done in the same manner by placing the beam/board/slab on top of the half milled log, and then milling through it as per normal operation.
Tensioned logs are easier to cut with a Peterson mill because with only one blade cutting at a time, you are releasing the tension/stress slowly out of the log, keeping your boards much more uniform. For example, the majority of pressure that is put on the blade is when making horizontal cuts in high tensioned logs. If you are cutting 8″ wide boards the Peterson mill can make the cut in two passes (i.e. 2 x 4″ cuts), releasing the pressure slowly thus increasing the life of your blades.
A unique feature of all Peterson Portable Sawmills, is the ease of double cutting timber slabs by a single operator. A double cut is the joining of two horizontal cuts together to obtain a wider board or slab using both sides of the blade.
Unlike cheaper imitations, with the Peterson range there is no need to turn the mill to achieve the double cut.
For holding logs in the right place, make yourself a couple of good large hardwood skids, and cut out a series of different sized notches as shown.
![]() The smaller notches will hold small logs and should be first on the end you roll your logs in from
The smaller notches will hold small logs and should be first on the end you roll your logs in from
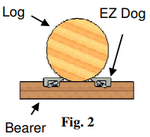 We also sell EZ Dogs which are placed on the bearers. This is very effective in holding logs of all sizes
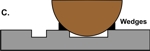 Alternatively, you can cut yourself some wedges and use those effectively for wedging each side of large logs
When cutting low on a log that has tension, leave an edge on the right hand side of the log. This will give more support to the log and provide more accurate last boards and will stop the log from sagging and moving.

 Try cutting the back-cut first. This allows you to visually line up the second cut with your standard cut. You can easily adjust the winch up or down to line up the cuts, without having to walk around to the other side of the mill.
If you wish to cut several boards that will later be glued together for table or bench tops, number each piece as it comes off the log. That way you can easily match the grain later after drying.
 Leave a small ledge on the log, placing the board to be re-sawn next to it. Double-cut the board, so when pulling back on the mill, the blade forces the board against the ledge, and prevents any movement during the cutting process.
Before sharpening your blade, take the top slab off your log. The first slab dulls the blade the most, due to the large amount of grit and bark. Doing this first, will prolong the duration between sharpenings.
Leave a small uncut 5mm ledge before making the finished cut, so the ledge supports the weight of the double-width board. This offers an alternative to wedging.
It’s a good idea to do the vertical cut first when you’re at the bottom of a slab. If the horizontal cut shifts the slab sideways, the timber is already edged so your boards should still come off fine.

Use a stick or similar to correctly line up the centres of both sides of an oddly shaped log with the mill tracks. This way you will optimise the output of hardwood (closer to the centre) as opposed to sapwood (closer to the bark). The track frame must be parallel for this to work.
Use three skids for bunk supports to stop the bottom slab from collapsing as it cuts. This will allow you to get maximum yield from any given log. It also stops the bottom slab from sagging or bouncing.
When positioning your Sawmilling Skids you need to keep in mind where your large diameter log center (Large Notch) needs to be.
You will also need to have at least a 6-8″ (170mm – 200mm) gap between the inside of your right hand track and the edge of your 8” X 12” (200mm – 300mm) Sawmilling skid this is to allow room for your loading roller to pass through when milling the last few boards out of your log.
For Double cutting you will need to allow enough room for your center unit to allow you to use the left side of your blade when cutting in the horizontal.
Sight the blade in both horizontal and vertical positions, to ensure that your log is parallel before you begin milling.

Make a pair of ramps easily, by first cutting an 8×8 beam. Put it back onto the log at an angle, and cut vertically as per normal. These can be used to help roll logs over your tracks easily. The weight of the beam will keep it in place as it is being cut.
 When cutting low on a log that has tension, leave an edge on the right hand side of the log. This will give more support to the log and provide more accurate last boards and will stop the log from sagging and moving.
It is better to have the log on the ground during slabbing as this stops any sideways movement. If you are using skids, make sure they are big and have good notches.
If you are able to, angle your log on a downwards slope, so gravity helps to feed the slabber through the log. This helps prevent both operator and engine fatigue.
A lot of beginner sawyers cut V’s out of their log bunks to hold the log in place, but these often do not work. A better method is to cut out actual square notches as a guide 10”-12” (250 – 300mm) in length x 50mm in depth. Cutting large 8″ x 12″ bunks, rather than small supports, is also more beneficial.
If you are milling a lot of small diameter logs let’s say 200mm – 300mm (7.8″ – 11.8″) in diameter then you will need the EZ Dogs to secure the logs to your sawmilling skids which allow you to safely mill those small diameter logs.
If you are mainly milling medium – large diameter logs then you won’t need to use them and please note when you do use them and want to cut the last couple of boards out of the bottom of your log you will need to remove the 2 left hand EZ Dogs to get access to your log.
In most situations, EZ Dogs are the ideal log holding system as this prevents the spinning blade from moving the log.
You will need 2 pairs of EZ Dogs. The set includes 4 clamps and aluminium 6 spikes ( you have 2 spare spikes)
Take wind direction into account when setting up your mill, so as to avoid inhaling excess sawdust and exhaust fumes.
Before you do a cut, lock your sizing device in the reset zone, to completely eliminate any centre unit sideways movement.
When using an ATS model, clip-on, or dedicated slabber, try rolling the black carriage wheels to engage the bar into the log. This makes it easier, not having to push it through.
Put some household dish washing liquid in the water container to reduce friction on the blade, and also algae build-up in the container.
Buy a tin of silicon spray and use it daily on your chains, top turning shaft, and bed sliding areas.
When you are wheeling the carriage into position over the tracks, do not push it forward and attempt to roll it over your skids. Instead, reverse it in, and ease the wheels over the skids while pulling backwards.
Do not over-push your mill – listen to the sound of the engine and let the blade do the work. If you feel you need to over-push, your mill probably needs an adjustment.
Turn the water off when doing your sizing, so that you don’t waste water.
When cutting large logs, and to ensure the mill will fit around the log on all sides, set your log’s centre about 6″ to the right of the skid’s half-way mark. This is the position to cut your Larger Notch in your Sawmilling skids. Measuring from the inside face of each track the Total Length would be around:
WPF – 2.55m Track Skid Center is 1.275m
Log Center = 1.125 Middle of your 100 -150mm x 50mm in depth Large Diameter log Notch
ATS – 2.620m Track Skid Center is 1.31m
Log Center = 1.160 Middle of your 100 -150mm x 50mm in depth Large Diameter log Notch
JP – 1.79m Track Skid Center is 0.895m
Log Center = 0.745 Middle of your 100mm x 50mm in depth Large Diameter log Notch

When setting up your skids in long grass, it is often hard to eyeball from one to the other to get them parallel. In this case, set another 6″ x 2″ on the top of each skid to use as your eyeball
When setting up your Hi/Lo centre support leg on soft ground, push it into the ground firmly with your foot, then adjust the bracket height. This way it cannot sink further while milling.
When doing your blade adjustments, remember that each of the four adjustments are separate, and will not alter each other. Concentrate on the horizontal plane first, then the vertical.
Traverse the saw up and down the tracks before tightening diagonal supports on your WPF or ASM Hi tracks. This will extend the life of your rollers.
When strapping down your mill for transport, an alternative to strapping the bed is to go over the top of the frame. This will prevent chain stretch, which may happen as the bed is pulled down, which can then upset blade adjustments.